Setting Up Rmfakecloud
Table of Contents
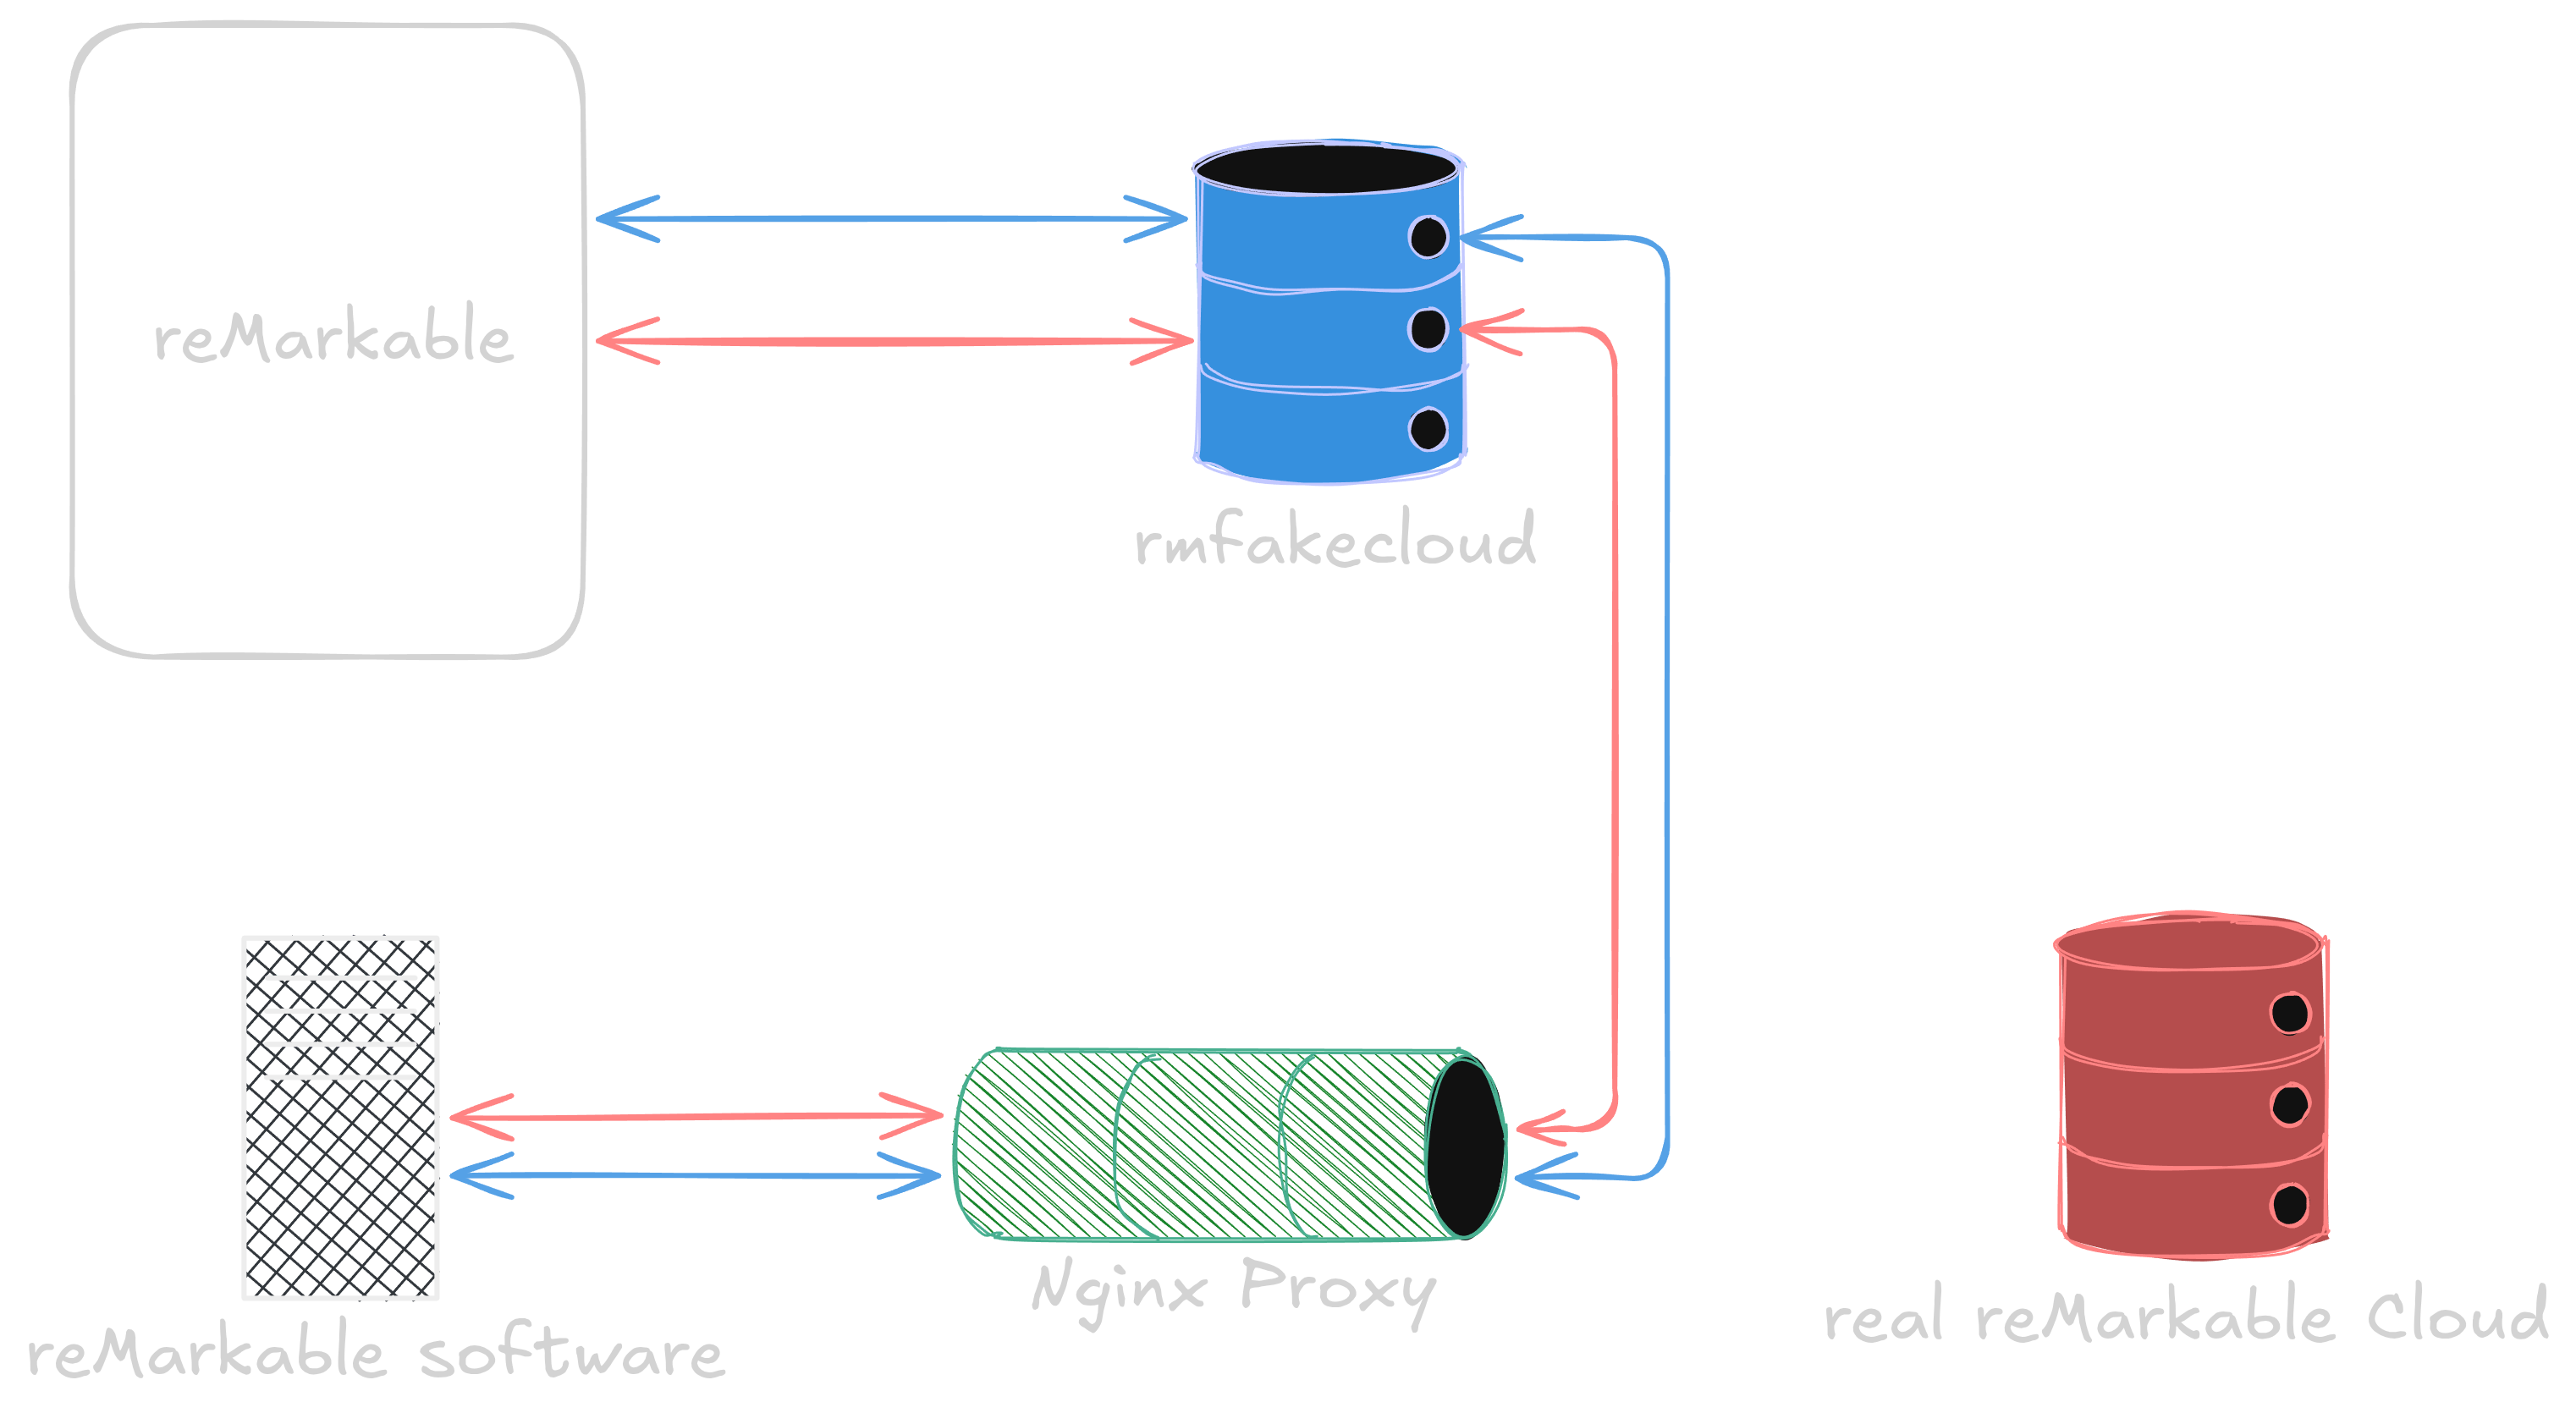
Deploying my own reMarkable cloud replacement turned out to be far more intricate than I first expected. This post documents the full process—from container setup, to device redirection, to integrating the Linux desktop app—along with the obstacles I faced and how I resolved them.
Special thanks to the excellent community in the Discord server for troubleshooting assistance.
This guide assumes you already have basic familiarity with Docker, a registered domain, and a Cloudflare account.
I followed the official installation guide as a baseline. For alternative approaches, I recommend reading Scott Labs’s post.
The Setup
Preparing the rmfakecloud Container
Generate your JWT secret key
openssl rand -base64 48
Create the folder structure
mkdir rmfakecloud
mkdir ./rmfakecloud/data
touch ./rmfakecloud/docker-compose.yml
Populate docker-compose.yml
services:
  rmfakecloud:
    image: ddvk/rmfakecloud
    container_name: rmfakecloud
    restart: unless-stopped
    environment:
      - JWT_SECRET_KEY=secret_here
      - STORAGE_URL=url_here
    volumes:
      - ./data:/data
    ports:
      - "7000:3000"
My STORAGE_URL is remarkable.birk.blog.
Port 7000 is intentional because port 3000 is already in use on my system.
Start the container, then navigate to: http://127.0.0.1:3000 or, in my case: http://127.0.0.1:7000
(Important: explicitly use http:// or your browser may auto-redirect to HTTPS, which will fail.)
On first load, you’ll be prompted to set your username and password.
Exposing rmfakecloud through Cloudflare Tunnel
I already have a Cloudflare Tunnel running, so I simply added a new public hostname:
- Hostname:
remarkable.birk.blog - Service: port 7000
After Cloudflare’s DNS has updated (which in my experience may take up to 24 hours), rmfakecloud becomes accessible at: https://remarkable.birk.blog
Redirecting Traffic From the reMarkable Device
To connect your device to the new cloud, you must retrieve its SSH credentials. The steps differ slightly depending on firmware.
For devices running 3.8 or earlier
- Connect to Wi-Fi or USB.
- Open the main menu.
- Go to Settings.
- Go to Help.
- Open Copyright and licenses.
- Under “GPLv3 Compliance,” find the password and IP addresses.
For devices running 3.9
- Connect to Wi-Fi or USB.
- Open the main menu.
- Go to Settings.
- Go to About.
- Open Copyright and licenses.
- Retrieve the password and IPs in the “GPLv3 Compliance” section. (Source: https://remarkable.guide/guide/access/ssh.html)
Install the rmfakecloud proxy on the device
Download the correct proxy installer from: here
Upload the installer to the device
scp installer.sh [email protected]:
SSH into the device
Make the script executable
chmod +x ./installer.sh
Run the installer with your cloud URL
./installer.sh install url_here
My URL is: https://remarkable.birk.blog
Restart the device. Then:
- Go to Menu → Settings → Account
- Select Pair with the reMarkable cloud
- On your PC, open the dashboard’s Connect tab:
https://remarkable.birk.blog/connect - Enter the pairing code shown there into your device.
After pairing, go to Storage Settings on the device and select Check Sync.
Once syncing finishes, the dashboard’s Documents view (/documents) will display your files—although you still cannot view document contents directly.
Using the reMarkable Desktop App on Linux
There is no native Linux application, so we will run the Windows client using Bottles.
Install Bottles
flatpak install flathub com.usebottles.bottles
Launch Bottles, open the top-right menu, and navigate to:
Preferences → Runners → Kron4ek
Install a suitable runner version; I used:
kron4ek-wine-10.18-amd64
Create a new bottle:
- Click the “+” icon
- Select Application
- Assign a name
- Choose the installed Kron4ek runner
Download the Windows app installer from: here
In your bottle, select Run executable and choose the installer. After installation completes, browse the bottle’s C: drive to locate the executable. Mine was located at:
/home/birk/.var/app/com.usebottles.bottles/data/bottles/bottles/reMarkable/drive_c/reMarkable/reMarkable.exe
Right-click it and choose Open with Bottles.
Next, we ensure that the Windows app trusts our certificates and that all API calls are intercepted and forwarded to our rmfakecloud instance using Nginx.
Generating Certificates
CA key
openssl genrsa -out ca.key 4096
CA certificate
openssl req -x509 -new -nodes -key ca.key -sha256 -days 10950 -out ca.crt -subj "/CN=My reMarkable CA/O=MyOrg/C=US"
rmcloud.cnf
[req]
distinguished_name = req_distinguished_name
req_extensions = req_ext
prompt = no

[req_distinguished_name]
CN = my.remarkable.com

[req_ext]
subjectAltName = @alt_names

[alt_names]
DNS.1 = hwr-production-dot-remarkable-production.appspot.com
DNS.2 = service-manager-production-dot-remarkable-production.appspot.com
DNS.3 = local.appspot.com
DNS.4 = my.remarkable.com
DNS.5 = ping.remarkable.com
DNS.6 = internal.cloud.remarkable.com
DNS.7 = eu.tectonic.remarkable.com
DNS.8 = backtrace-proxy.cloud.remarkable.engineering
DNS.9 = dev.ping.remarkable.com
DNS.10 = dev.tectonic.remarkable.com
DNS.11 = dev.internal.cloud.remarkable.com
DNS.12 = eu.internal.tctn.cloud.remarkable.com
Server key
openssl genrsa -out server.key 4096
Server CSR
openssl req -new -key server.key -out server.csr -config rmcloud.cnf
Server certificate
openssl x509 -req -in server.csr -CA ca.crt -CAkey ca.key -CAcreateserial -out server.crt -days 825 -sha256 -extfile rmcloud.cnf -extensions req_ext
Creating an Nginx Proxy
/etc/nginx/conf.d/rmfakecloud.conf
server {
    listen 443 ssl;
    server_name hwr-production-dot-remarkable-production.appspot.com service-manager-production-dot-remarkable-production.appspot.com local.appspot.com my.remarkable.com ping.remarkable.com internal.cloud.remarkable.com eu.tectonic.remarkable.com backtrace-proxy.cloud.remarkable.engineering dev.ping.remarkable.com dev.tectonic.remarkable.com dev.internal.cloud.remarkable.com eu.internal.tctn.cloud.remarkable.com;

    ssl_certificate     /home/birk/Desktop/server.crt;
    ssl_certificate_key /home/birk/Desktop/server.key;

    location / {
        proxy_pass http://192.168.0.220:7000;
        proxy_set_header Host $host;
        proxy_set_header X-Real-IP $remote_addr;
        proxy_set_header X-Forwarded-For $proxy_add_x_forwarded_for;
    }
}
This IP 192.168.0.220 from proxy_pass is the address of my server, and port 7000 is where my rmfakecloud instance is running. Remember to configure your own ip.
(/home/birk/Desktop/server.crt and /home/birk/Desktop/server.key) point to where my generated certificates are stored on my system. Be sure to update these paths to match the actual locations of your own certificate files.
Restarting Nginx
systemctl restart nginx.service
Modifying /etc/hosts
127.0.0.1   hwr-production-dot-remarkable-production.appspot.com
127.0.0.1   service-manager-production-dot-remarkable-production.appspot.com
127.0.0.1   local.appspot.com
127.0.0.1   my.remarkable.com
127.0.0.1   ping.remarkable.com
127.0.0.1   internal.cloud.remarkable.com
127.0.0.1   eu.tectonic.remarkable.com
127.0.0.1   backtrace-proxy.cloud.remarkable.engineering
127.0.0.1   dev.ping.remarkable.com
127.0.0.1   dev.tectonic.remarkable.com
127.0.0.1   dev.internal.cloud.remarkable.com
127.0.0.1   eu.internal.tctn.cloud.remarkable.com
Testing The Proxy
Now open up a browser and go to https://my.remarkable.com, this should display the rmfakecloud dashboard.
Trusting Your Certificates
On Linux
sudo cp ca.crt /usr/local/share/ca-certificates/rm_ca.crt
sudo update-ca-certificates
openssl verify -CAfile /etc/ssl/certs/ca-certificates.crt server.crt
Expect an OK.
In Bottles
Navigate to:
Tools → Control Panel → Internet Settings → Content → Certificates → Trusted Root Certification Authorities → Import
Import ca.crt and select the “Automatically select certificate store” option.
(Credit to .greysim from Discord for guidance on the Bottles configuration.)
Once everything is trusted and the proxy is in place, launch the reMarkable application, enter the connection code, and the client should now communicate fully with your self-hosted rmfakecloud instance.